First Term Home Econs Lesson Note for Primary 6
ACCESS ALL LESSON NOTES
ACCESS ALL QUESTIONS AND ANSWERS
ACCESS ALL WORKSHEETS
ACCESS ALL JOBS ACCESS
ACCESS WAEC QUESTIONS AND ANSWERS
FIRST TERM
PRIMARY 6
WEEK 1
TOPIC: THE SEWING MACHINE
LEARNING OBJECTIVES
1. Types of Sewing Machine
2. Parts of A Sewing Machine
3. Functions of Each Parts of Sewing Machine
PERFORMANCE OBJECTIVES
1. Mention types of sewing machines;
2. Identity parts of a sewing machine;
INSTRUCTIONAL MATERIALS
The teacher will teach the lesson with the aid of:
a sewing machine, a labelled diagram of a sewing machine.
REFERENCE MATERIALS
. Scheme of Work
. 9 – Years Basic Education Curriculum
All Relevant Material
. Online Information
CONTENT OF THE LESSON
– INTRODUCTION
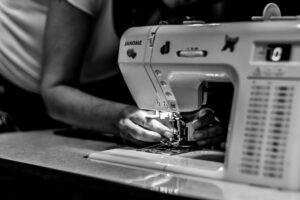
A sewing machine is a machine used to stitch fabric and other materials together with thread.
Sewing machines were invented during the first Industrial revolution to decrease the amount of manual sewing work performed in clothing companies.
TYPES OF SEWING MACHINE
1. Handy Sewing Machine
Handy Stitch is also known as the portable hand-held sewing machine.
It is great for quick repairs or jobs that conventional desktop machines can not handle, like sewing curtains while on the rod, or mending a torn pocket without having to remove your pants.
2. Mechanical Sewing Machine
These machines are also called as manual machines/tailoring machine/treadle sewing machine/domestic sewing machines where the basic settings are done manually by the user.
These machines are best suitable for the beginners who want to learn sewing from basics.
3. Electronic Sewing Machine
Electronic sewing machines have more features than a mechanical sewing machine.These sewing machines are the combination of mechanical sewing machine and computerized sewing machine.
4. Computerized or Automated Sewing Machine
Computerized Sewing Machines are high technology sewing machines which can be connected to the internet, computer or design loaded cards.
These machines are best suitable for industrial purpose.
5. Embroidery Machine
Embroidery machines are meant for designing different patterns of embroidery on the fabric.
PARTS OF SEWING MACHINE
Head
Teeth
Wheel
Bobbin
Reeler
ADVANTAGES OF THE SEWING MACHINE
1. It makes sewing to be easier and faster.
2. It makes the work to be neat.
FUNCTIONS OF THE PARTS OF THE SEWING MACHINE
1. Spool pin
The main function of spool pin is to hold the spool of thread.
2. Bobbin binder spindle
During winding, bobbin is placed here.
3. Bobbin winder stopper
When bobbin reaches its optimum capacity then bobbin winder stopper stops the bobbin winding.
4. Stitch width dial
The main object of stitch width dial is to control the zigzag stitch.
5. Pattern selector dial
Pattern selector dial is to set the symbol of the desired stitch pattern.
6. Hand wheel
Hand wheel is used to raise and lower the need, which is situated in the right side of the machine.
7. Stitch length dial
Stitch length dial is used to control the length of the stitch.
8. Reverse stitch lever
The machine will sew in the reverse while the lever is pushed.
9. Power switch
Power switch means the off-on office of the sewing machine. Normally power switch is located at the right side of the machine.
10. Bobbin winder thread guide
These types of thread guide are used during bobbin winding.
11. Thread tension dial
Thread tension dial is used to control the tension on the top thread.
12. Thread take-up lever
During sewing the top thread passes through the thread take-up lever. Thread take-up lever moves up and down with the needle.
13. Needle clamp screw
Needle clamp screw holds the needle in its actual place.
14. Presser foot
Presser foot holds the fabric in its definite place.
15. Bobbin cover
During sewing bobbin cover protects and covers the bobbin holder.
16. Bobbin cover release button
This type of button is used to release the cover for entrance to the bobbin.
17. Feed dog
During sewing, feed dog pulls the fabric in forward.
18. Needle
Needle is used to form a stitch in the garments.
19. Needle plate
Needle plate is a metal plate which is situated under the needle and presser foot. It helps to move the fabric forward during sewing.
PRESENTATION
Step 1: Teacher revised the previous topic
Step 2: Teacher introduces the new topic
Step 3: Teacher explains the new topic
Step 4: Teacher welcomes pupils questions
Step5: Teacher evaluates the pupils
Wrap- up (conclusion): Teacher goes over the topic ones again for better understanding
EVALUATION/ASSIGNMENT
Pupils to:
1. Identity two kinds of sewing machine;
2. State three differences between hand and treadle sewing machine;
3. Mention four parts of a sewing machine.
4. State the functions of the parts of the sewing machine mentioned in 3 above.
WEEK 2
TOPIC: THE SEWING MACHINE
LEARNING AREA
Uses and Cares for the Sewing Machines
PERFORMANCE OBJECTIVES
1. Explain how to use and care for the sewing machine.
2. State two ways of caring for sewing machine.
3. Demonstrate the uses of a sewing machine.
4. Oil and sun the machine to remove fluffs.
5. Demonstrate how to pack and store a sewing machine.
INSTRUCTIONAL MATERIALS
The teacher will teach the lesson with the aid of:
a sewing machine
sewing machine engine oil
different pack for sewing machine tools.
REFERENCE MATERIALS
Scheme of Work
. All Relevant Material
Online Information
CONTENT OF THE LESSON
– INTRODUCTION
A sewing machine is a machine used to stitch fabric and other materials together with thread.
Sewing machines can be exciting but also totally overwhelming when you don’t know how to use the machine!In sewing, the first place to start is how to use a sewing machine!
HOW TO USE SEW SEWING MACHINE
1. Select a straight stitch and a medium stitch length.
A straight stitch is used to sew most seams.
2. Practice on some scrap material.
3. Line up the fabric under the needle.
4. Lower the presser foot onto the fabric.
5. Hold the loose ends of both threads.
6. Press the foot pedal.
7. Find the reverse button or lever and try it.
8. Use the hand wheel to move the needle to its highest position.
9. Cut the thread.
10. Practice sewing a seam.
11. Move to another part of the fabric.
12. Learn to sew a sharp corner.
13. Try a simple project.
– CARES FOR THE SEWING MACHINES
1. Always keep the sewing machine covered.
2. Change the needles when necessary.
3. Always use compressed air to remove the lint.
4. Always service the sewing machine as when due.
5. Oiling the sewing machine from time to time.
6. Call for experienced professional for repairing the sewing machine.
7. Clean each parts of the sewing machine at a time.
8. Wipe down the sewing machine after use.
PRESENTATION
Step 1: Teacher revised the previous topic
Step 2: Teacher introduces the new topic
Step 3: Teacher explains the new topic
Step 4: Teacher welcomes pupils questions
Step5: Teacher evaluates the pupils
Wrap- up (conclusion): Teacher goes over the topic ones again for better understanding
EVALUATION/ASSIGNMENT
Pupils to:
1. Identity two kinds of sewing machine;
2. State three differences between hand and treadle sewing machine;
3. Mention four parts of a sewing machine.
4. State the functions of the parts of the sewing machine mentioned in 3 above.
LESSON EVALUATION/ASSIGNMENT
Pupils to:
use and care for the sewing machine.
WEEK 3
TOPIC: THE SEWING MACHINE
LEARNING AREA
1. Sewing Measuring Tools
2. Taking Measurements
PERFORMANCE OBJECTIVES
1. explain measuring tools.
2. identify measuring tools.
2. take body measurement accurately.
INSTRUCTIONAL MATERIALS
The teacher will teach the lesson with the aid of:
Tape, measurement, stick, tailors chalk, pencil, brown paper, fabric, e.g. calico;
A chart showing body measurements; Finished articles sewing tools/equipment.
REFERENCE MATERIALS
Scheme of Work
All Relevant Material
Online Information
CONTENT OF THE LESSON
INTRODUCTION
Measuring Tools are tools used for patterns and body measurements to ensure accuracy and good outfits.
It is important and professional take accurate measurements in order to ensure good outfits. For accurate measurements, the following sewing measuring tools are used.
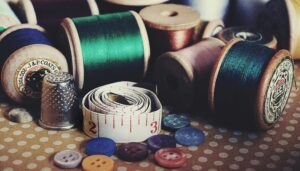
SEWING MEASURING TOOLS
Measuring and sewing tools for body measurement and garment construction –
1. Tape measure
2. Tailor’s chalk
3. Ruler
4. Scissor
5. Cutting board/table
6. Pin cushion
7. Pins
8. Needle
9. Flat iron
10. Ironing board, etc.
TAKING MALE AND WOMAN BODY MEASUREMENTS
Men’s Sizing Charts
Parts of the body to be measured –
1. Chest
Take measurement up under the arms and around chest.
2. Sleeves
Measure from the base of the neck, across shoulder, down arm to slightly bent elbow and up to wrist.
3. Waist
Measure circumference at the narrowest part.
4. Hips
Measure at the fullest point, standing with feet together.
5. Hats
Measure around the largest part of the head.
6. Gloves and mitts
On adult gloves and mitts, your hand circumference in inches equals glove size. Measure around a flat hand at the knuckles; do not include thumb.
7. Full length
Women’s Sizing Charts
Parts of the body to be measured –
1. Bust
Measure all the way around your bust and back on the line of your nipples.
2. Chest
Measure directly under your breasts, as high up as possible.
3. Waist
Measure at its narrowest point width-wise, usually just above the navel.
4. Hips
Measure around the widest part of the hipbones.
5. Midway
Measure midway between the widest part of your hips and your waist.
6. Thighs
Measure around fullest part of upper leg while standing.
7. Knees
Measure immediately above the knee.
8. Calves
Measure around fullest part.
9. Upper arm
Measure above your elbows – around fullest part.
10. Forearms
Measure below your elbows – around fullest part.
11. Full length
PRESENTATION
Step 1: Teacher revised the previous topic
Step 2: Teacher introduces the new topic
Step 3: Teacher explains the new topic
Step 4: Teacher welcomes pupils questions
Step5: Teacher evaluates the pupils
Wrap- up (conclusion): Teacher goes over the topic ones again for better understanding
EVALUATION/ASSIGNMENT
1. Mention four measuring tools;
2. Name five parts of the body to be measured for clothing construction.
3. Take accurate measurements of male and female.
WEEK 4
TOPIC – HOW TO PRODUCE SIMPLE CLOTHING ARTICLES – APRON AND CAP
LEARNING AREA
1. Meaning of Apron and Cap
2. Materials Needed for Making Kitchen Apron
3. Sketch an Apron and Cap for Self on Brown Paper
4. Practice Sewing Apron and Cap to Exhibit their Products.
PERFORMANCE OBJECTIVES
make a simple clothing articles – apron and cap.
INSTRUCTIONAL MATERIALS
The teacher will teach the lesson with the aid of:
materials needed for making simple clothing materials – apron.
REFERENCE MATERIALS
Scheme of Work
Course Book
All Relevant Materials
CONTENT OF THE LESSON
INTRODUCTION (APRON)
Apron is a piece of clothing that chef wear over the front of other clothes before you start cooking to prevent the cloth from getting dirty when you are cooking.
DON’T STRESS, JUST LET PROFESSIONALS DO THE STRESS, CLICK HERE TO BUY THE COMPLETE LESSON NOTE (WEEK 1-12 WITH PICTURES AND REFERENCES) FOR JUST 800 NAIRA OR HIT THE WHATSAPP BUTTON BELOW
OR HIT THE WHATSAPP BUTTON TO CONTACT US
ACCESS ALL LESSON NOTES
ACCESS ALL QUESTIONS AND ANSWERS
ACCESS ALL WORKSHEETS
ACCESS ALL JOBS ACCESS
ACCESS WAEC QUESTIONS AND ANSWERS
